Friday, December 12, 2008
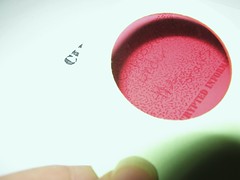
Reflections ornament
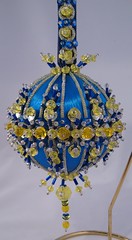
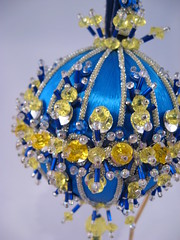
As I settle into my new craft room, I'm taking on the UFOs. I bought this kit about 10 years ago from Cracker Box. If you subscribe to "more is more," then these kits are for you!
I worked on this for a few hours at a time over about 4 days. My fingers got really sore by the end! I'd tried using a thimble, but it was just too big to get down into the spaces between the beads. I know now why they recommend a tool which is used for countersinking nails!
I did need to modify the instructions a bit. See the circular section of the silver braid, most evident on the hanger? In the instructions, it was an oval, so there were fewer wedges of bead designs on the sample. I guess the tension on the braid machine was extra tight on the day mine was made! At any rate, the increased number of wedges left me short on a few styles of beads, so I modified and simplified every other wedge.
I think the end result is still pretty fantastic!
Monday, December 1, 2008
Quickie Ikea Hack

My daughter has been wanting a clock in her room, more for decoration than for telling time. I've never been able to find something that matched her decor (aqua and lime) without it being emblazoned with characters.
Ikea to the rescue! I purchased the Rusch clock in white, bargain basement price of $3. I pried off the clear dome over the clock face and went to work. First, I colored the white plastic frame with Ranger Alcohol Inks. Then I went to work on the face itself. The hands of the clock lift right off, allowing you to pull up the paper face. I simply covered the numbered paper face with glue stick and slapped it onto a piece of scrapbook paper. When that was dry, I cut out the circle, using an eyelet tool for the center circle. The numbers were cut with the George cartridge on the Cricut. I put the clock face on a window so that I could use it as a light box to line up the numbers--even with the scrapbook paper over the paper face, the numbers showed through really well. The numbers were just glue sticked into place.
I went over the red second hand with black StazOn ink. I guess if I wanted to really get into it, I could've spray painted it, but I wasn't that committed. I did add a nice rhinestone to the center, though. I put everything back together and noticed something I didn't like. There's a channel all around the clock frame where the alcohol ink didn't go. I decided to make it part of the overall look by filling the groove with Glossy Accents by Ranger, and then pouring on the holeless microbeads in a lime color. It does take a while to dry, but I think the effect is worth it!
Sunday, November 30, 2008
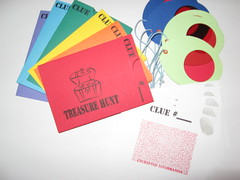
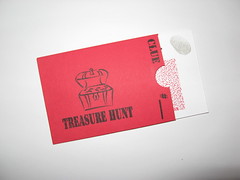
Treasure Hunt Kit
More crafting fun! I created a fun Treasure Hunt kit with stamps from Clear Dollar Stamps. It was a bit work intensive, but definitely worth it! I'm sure my son's next birthday party will involve a fun frenzy of treasure hunting!
I had a bit of a hard time getting the red cellophane for the lenses. They did have it at AC Moore (but not at Michael's) but it was a pretty large roll, and it was $4. I'm sure you will understand when I say that I am a frugal crafter! I ended up scoring the cello at a local art supply store which also has a decent candy making department. The roll was nearly as large as the one at the Big Box, but it was only .99!
The lenses were punched from two layers of cardstock, which allowed me to sandwich the cello. They were also nice and sturdy, but I wanted to be able to have a way for the kids to carry them along from spot to spot. I decided to add an eyelet and a bit of heavy elastic thread. Mission accomplished!
To write out the clues, you just write lightly in pencil on the red stamped box on the clue card. If you're using a red lens, I also found that pale green marker works really well.
Tuesday, November 25, 2008
Don't make these mistakes!
A couple of years ago, a dear friend gifted me a beautiful Odessa hat. My sweet daughter promptly stole it from me. While she loves the hat, it isn't her favorite color. I decided to go ahead and knit her another Odessa in the turquoise she so loves.
Mistake 1: not printing out the pattern. The Odessa was originally published in MagKnits, an online zine that closed up a while back. The pattern has been moved to Ravelry, but I had never joined. If you're at all interested, do request an invitation, it only takes a few days! So I got about as web savvy as I could (read: not at all) and plugged the old Magknits link into the Wayback Machine, and I got my pattern.
Mistake 2: cheap yarn. OK, pure laziness on my part. My local yarn shops aren't all that local, or they don't have convenient hours. Thirty minute drive to a yarn shop, or hit the yarn aisle when I'm at Michaels three times a week? Sadly, I bought the yarn at Michaels, and it was cheap Red Heart. I was forced into it by weight and color--they do have a few decent balls of yarn there, but none suitable for the Odessa.
Mistake 3: not making a swatch. OK, more laziness. But I'm not a master knitter, so I can't even wrap my brain around swatching this pattern. It's knit in the round, so I'd have to basically knit up a hat to get a swatch anyway. See where this is going?
The finished project:

It doesn't look terrible lying flat. But it's too big for Emmy. It's OK, I'll wear it, but it's nowhere near as lovely as the gifted Odessa. Let's just say that Red Heart DK isn't at all DK. It's more like worsted. Plus, my hands started to hurt after a couple of hours of knitting. I hate hate hate it when yarn creaks. Lessons learned! I'll hit the yarn shop after Thanksgiving and find some proper yarn. I still have half a ball of crummy Red Heart left. I swear I'd burn it if I knew it wouldn't release toxic gasses and immediately kill off an acre of rainforest!
Tuesday, November 18, 2008
Jumping on the bandwagon


I think everyone has bought the Top Note die from Stampin' UP! Mine finally arrived last week, and I just got some time to sit down and play with it. First, I die cut the Top Note in Tempting Turquoise and Pacific Point. I cut off the outer border of the Tempting Turquoise piece, and used my Quickie Glue Pen to attach the thin border to the Pacific Point piece. I'll put aside the inner piece to use on another project.
For the focal image, I stamped the butterfly image from Stampin' UP! Garden Collage set in Ranger Archival black ink. I used watercolor paper, so that I could go in with my watercolor pencils to color the image. Just a bit of blending with an Aquapainter and it looks great! Then I coated the image with 4 layers of Ultra Thick Embossing Enamel. When the last layer had cooled completely, I gave the piece a gentle crack. I rubbed a bit of Ranger Distress ink in Broken China over the image and wiped it off with a tissue to give the cracks a bit of depth.
Everything is layered up on a piece of Sahara Sand cardstock stamping in Going Grey with the Floral backgrounder (all items are from Stampin' UP!).
Sunday, November 2, 2008
Cool new Purple Onion stamps

I recently stumbled upon the new Note Block stamps at Purple Onion. Not only did I like the bold graphics, but I loved the potential for super quick cards that these stamps afforded. I was supposed to be cleaning up the office today, but I stole five minutes to whip up a quick holiday card.
First I stamped the Happy Holidays Note Block stamp on to some striped paper. I quickly cut it out with a craft knife and matted it on some tomato red paper. I created a card base with Stampin' UP! Garden Green cardstock which was embossed with the Cuttlebug Swiss Dot folder. I tied some Stampin' UP! striped grosgrain ribbon around the card front, and mounted my stamped image on some dimensionals. Easy peasy!
Friday, October 17, 2008
Busting out glitter for Day of the Dead


We started celebrating Day of the Dead last year. I'll admit that I was lured in by The Crafty Chica, Kathy Cano-Murillo. But really, who can resist brightly colored paint and glitter!
Last year's major project was an altar for my grandfather, Robert Somerville, who passed away. Em got into making the paper flowers and the white chocolate calaveras. We invited a bunch of friends over for a party and had a wonderful time.
Because the house is under major renovation right now, we're on a party hiatus. I wanted to continue the tradition, though, so I've been on the lookout for some inspiration for a fun project. It hit me at the Dollar Tree yesterday. Skull shaped "pots" with an opening in the head which would be great for a little 4" marigold. They screamed for alteration, and here's my creation.
I started by glittering the teeth. Then I went to work with the puffy paint. No plan in mind, and it was fun to just doodle. Most of the real sugar skulls you see are decorated in pretty simple, abstract patterns. I went a little glam on this one. Now to decide if I should go back for more.....
Wednesday, October 15, 2008
Non Traditional Colorways

I like to do a few non-traditional colorways for some of my Christmas cards. I love the lush feel of the Vintage Violet background paper contrasted with the strip of kraft cardstock. It's hard to see, but I did accent the tree a bit with my Sakura Stardust pen. I love the way it adds just a touch of sparkle without the mess of glue and glitter. It dries pretty quickly too.
The stamp sets I used are Stampin' UP! Season of Joy and Heard from the Heart. The background paper I textured in my Sizzix with one of their plates. To bring out the subtle embossing, I used a Versamagic Wheat pad to lightly highlight the snowflakes. It's a nice, natural look with the flecked kraft and ivory natural cardstocks that I used for the other layers.
Tuesday, October 14, 2008
Starting in on the holiday cards


A couple of weeks ago I was browsing in Talbot's and heard Christmas music. Too early, I thought! But I'll confess that as a crafter, I'm one of those people who pushes towards Christmas before I give candy to a single Trick or Treater.
I wanted some instant gratification, so I went to the November 2007 Sheetload issue to get me started on some quick cards. After banging out a dozen cute cards, I had two small strips of printed paper left over. Never one to waste anything, I whipped up a second card style to use it up.
Wednesday, October 1, 2008
Super Scrapping


Moving the craft room has made me realize just how many craft supplies I have. With construction going on in the rest of the house, I've been forced to hang out in the office and face just how much stuff is here. Instead of wallowing in guilt, I've been scrapping. I promised a while back to donate scrapbook pages to parents of preemies, so I'm finally getting my butt in gear. I hope to be able to send out a pizza box full of pages by the end of the week. I'll show a couple of samples to give an idea of what I'm doing. I added a temporary pic of DD on the eggplant page just to show how lovely it will be with a photo.
If you're interested in donating scrapbook pages, please visit Pages for Preemies.
Thursday, September 25, 2008
Labelicious

I've been putting this project off for wayyyy too long. I made up a variety of 'cellos at the beginning of the summer. Of course the idea was to have them on hand for holiday gifts and such. Unfortunately, the Mello Cello has not survived the summer. It was just much too delicious! I made it just like a basic batch of limoncello, but I added 2 split vanilla beans. It's wonderfully smooth and, well, mellow!
These tags are just basic shipping tags from Office Max. The orange and strawberry are from the Stampin' UP! Tart & Tangy set. The lemon is from Stampin' UP! Sun Ripened II. The berry and orange are colored with markers, and the lemon was done with watercolor crayons. They were all "aged" with various Distress Inks and a bit of little "sprinkle" stamping.
Everyone has been asking for my recipe for the Mello Cello, and I have to admit that I "wing it" much like most of my other cooking. Here's the basic jist...
12 lemons, scrubbed to remove any shellac
2 vanilla beans Mexican are fine for this
1 liter bottle of Everclear. Have DH to cross state lines to get it if necessary.
1 empty 4 liter bottle from cheap jug wine
Thoroughly clean wine jug. Peel lemons as thinly as possible, and drop peels into jug. You don't want any white parts, just the colored outer skin. Split vanilla beans and drop into jug. Dump bottle of Everclear into wine jug, cap, and put it in a basement or other cool dark spot for at least a week. When your alcohol is a lovely yellow color, it's ready.
Strain peels, vanilla, and discard. Prepare a simple syrup. I use about 8 cups of sugar and 8 cups of water. When cool, add to your jug. Mix well and you're done! If you like a thicker, more syrupy drink, go heavier on the sugar water. If you like the more traditional "warming" drink, you may want less.
We like to drink our Mello Cello in small rocks glasses over chipped ice.
Sunday, September 21, 2008
Cruisin project from Club Scrap
I've been carrying around this magazine about mini books for about two months now. It's been to the park, cheerleading practice, and a doctor's appointment, among other places. Unfortunately, it hasn't been in the craft room. I was inspired, though, when my August Club Scrap kit arrived, and it included a mini book kit.
I made up the Cruisin' project for the most part with the materials in the kit, and leftovers from the August scrapbook pages. I think the only "outside" item I added were the Philips head brads on the page with my son helping to build the shed.
My only regret is that I didn't trace off a template before I made the project. I may just go back for more in order to be able to easily recreate the flip folio.
Sunday, September 7, 2008
Handcrafted assignment book
 Yet another fantastic project from Club Scrap! I seriously love the colors of this month's Cyprus kit, and the bookbinding project is awesome! This book measures about 5x7 and houses an assignment tablet inside as well as a pen holder and pocket.
 What you can't see is my salvage effort on the front cover. I tried to apply a rub on quote from a company who shall remain nameless. Unfortunately, in spite of rubbing so hard I was denting the chipboard underneath, the darned thing refused to release. As I pulled the carrier sheet back, it actually tore up the paper! Thank goodness I get the extra "Pound of Paper" in my Club Scrap kit. This gave me some extra scraps on which to rubber stamp an appropriate quote and cover the damage. Ahh, as they say in papercrafting, there are no mistakes, only opportunities for embellishment! Nearly everything on this project was in the kit, I only added a couple of stamps, a tag, and two little bits of fiber.
I know I'm gushing, but I can't get over the value of the Club Scrap kits. What would you pay for this project at a craft store, $20 or more? Or if you take it as a class, $35? Then consider that on top of this project you get an entire scrapbooking kit for 13 pages, right down to fibers, titles and tags, brads, beads, embellishments, a stencil AND complete instructions for making those pages. When I add in my extra pound of paper and the shipping charge, I'm spending $41 and change. Seriously, I feel like I'm stealing!
Tuesday, August 12, 2008


Sunday, August 10, 2008
Philly Livestrong Challenge

My husband is gearing up (pun intended) to ride 100 miles in the Philly Livestrong Challenge on August 24th. We have gotten some great donations from friends and family, so I whipped up an appropriate thank you card for him to send out.
The bicycle stamp is by Inkadinkado. The sentiment is from TAC. This is all basic matting and layering. The base layer is DCWV paper which has been embossed and sanded. I used the Perfect Layers tool to get mats for the main image. The layers for the sentiment are just circle punches.
Thursday, July 17, 2008
Bookbinding skillz
Bookbinding is something I've been interested in for years, but I've never made the time to take a formal class. Thankfully, I found Tricia Morris, who has great online tutorials on TV Weekly.

I saw this accordion file kit at Club Scrap, but being the over-stashed and under-funded craftster, I resisted temptation. I managed to use the online guide to properly cut my bookboard from Dick Blick, and I pulled papers and ribbon from the stash.
The only problem I foresee is that the ribbon closure pulls on the paper at the back, and the paper is pulling up a bit. I think when I do this again, I may set eyelets in the back for the ribbon to go through, eliminating the weakness. I could always set up a decorative hook closure, or perhaps one of those magnetic purse snaps instead, eliminating the ribbon altogether.
I've already completed a second box, done more as a recipe box, which I coated all over with polyurethane. Easy to clean up any kitchen messes that way. Photo of that one to follow soon!
Monday, June 30, 2008
Pillowcase dress
I loved the soft feel of this vintage pillowcase, and that made it perfect for a little girl's dress. I used a bit of the top of the pillowcase to create armhole bindings, and then sewed casings at the top. The dress is finished off with ribbon ties and lime green ric rac.
The great thing about pillowcase dresses is that they can fit girls for a long time. They go from a midcalf length sundress on a 3 year old to an above the knee dress on a 7 year old. Wear can even be extended a bit longer when you layer the dress over leggings.
Pretty, cool, versatile, longwearing... what more can you ask?
Oh, yeah, buy it at my Etsy shop, LOL!
http://www.etsy.com/view_listing.php?listing_id=12980681
Saturday, June 28, 2008
How to make a dozen cards in 90 minutes

First, get thee to Sheetload and download an issue. Second, check out the recipe and gather the necessary papers. For this set, based on the November 2007 issue, I used 3 coordinating designer papers, a sheet of vanilla, and scraps for the other layer. I also used two different colors of ribbon and a few different stamp sets.
Next, use the recipe to cut all of your layers. This one is quickie quickie, I used my Tonic guillotine trimmer for all of the straight cuts, and my craft knife and acrylic ruler for the diagonal cuts. Go ahead and cut your ribbon strips now too.
What I did next was to layer the bases, using my ATG to get the triangles on to the base mat. I went ahead and stamped and edge punched my greeting panels, and finally added the ribbon and greeting to the base mat.
Last, pull out your handy dandy box of 100 plain cards and envelopes from JoAnns. I seriously ordered 7 boxes of these when they put them on clearance a while back! ATG your panels on to the card bases and you're done!
Wednesday, June 25, 2008
Home dyed hair extensions
My 9 year old has been begging for blue streaks in her hair for about a year now. The only problem was that she's got medium brown, fine hair. I was afraid that the bleaching necessary to make Manic Panic show up on her would totally fry her hair.
The answer: get crafty! Pick up human hair extension weft, and clips at Sally, and bust out the Dharma Procion dyes. I did the turquoise and magenta in an acid bath, much like I'd do wool yarn. The blue piece used Special Effects dye, which I also had on hand. It didn't dye as evenly, and I have a feeling if we wash the pieces, the dye will come out. If that's the case, I'll re-do it with more Dharma dye.
I hope the girl is pleasantly surprised when she gets home from Girl Scout camp!
Wednesday, June 18, 2008
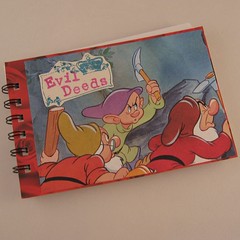
My Twisted Sense of Humor
I was making some of my kids sketchbooks, getting ready for summer shows, when I came upon this page in the Snow White storybook I was recycling. How creepy! Who is that, Dopey with the pickaxe? At any rate, it just begged to become a cover for a mini journal of Evil Deeds. Crown frame stamp is by Autumn Leaves, and lettering is by MSE.
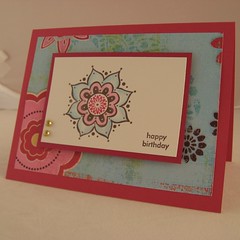
Back with the mojo
I'm so grateful to Sheetload of Cards. I love to be able to create without doing 100% of the work. I'm getting ready to do a big remodel on the house, so I'm on "use it up" mode. This card uses several scraps saved from other projects. Mandala image is from Stampin' UP!'s One of a Kind set. The sentiment is from their Amazing to Zany set, which is retiring soon.
Mandala was colored with watercolor pencils, and then accented with a bit of Stardust pen here and there.
Mandala was colored with watercolor pencils, and then accented with a bit of Stardust pen here and there.
Tuesday, March 4, 2008
I've been such a crafty slacker
With good excuse. February was "Girl Scout Cookie Month." This meant that I hosted a wall full of cases of cookies in our house. I also schlepped the cookies to 5 cookie booths, stayed home for moms to pick up cookies, called moms to turn in money, drove to distribution centers and other peoples houses to pick up more and more cookies. Today is the day I dropped off the paperwork to the Service Unit Cookie Manager, and I'm calling it done!
In the past few days, I've finalized plans with the dog sitter, house sitter and chicken sitter. I'm taking a much needed vacation! I'm hoping to suck up some creative energy so that I can get my but in the chair and create again!
In the past few days, I've finalized plans with the dog sitter, house sitter and chicken sitter. I'm taking a much needed vacation! I'm hoping to suck up some creative energy so that I can get my but in the chair and create again!
Monday, February 25, 2008
About productivity
I love to craft, but I don't feel the need to invent the wheel every day. Part of my morning ritual is to sit down at my computer with a cup of black coffee. After I do the important things like checking email, I let myself wander for a bit.
One of my favorite sources of inspiration is SplitcoastStampers. This huge, active message board is a visual all you can eat buffet. I love to stamp, and I love to create cards, so the gallery at Splitcoast is phenomenal for checking out new stamps, papers, and embellishments. When I need a little creative jolt, though, I check out the challenges in the forums. Each week, a card sketch is posted. It's just a little map to get you going, and it can unleash a lot of creativity without the stress of staring at a blank sheet of paper.
Along the same lines is Sheetload of Cards. It's a cheeky name for a brilliant concept. Not only is there a sketch, but there are cutting diagrams for all of your layering papers, and completed samples too. With the Sheetload pdf, you can whip out 6-8 cards in under an hour. I tried the concept for the first time last month, and I'm hooked!

This card uses DCWV Spring Stack roses and XO paper, Stampin' UP! red, black, grey and vellum paper, and Stampin' UP! gingham ribbon. I can't decide if I like the pierced or torn edge better on the red panel. Faux milagro heart is simply embossed in silver on the grey paper and attached with PopDots.
Finally, if you're interested in scrapbooking but have never given it a try for fear of staring at a HUGE sheet of blank paper, you might be interested in Club Scrap. When you join the club, you get a pizza box full of paper and embellishments delivered to your door each month. I can't say enough about the quality of the kits. The cardstock is top of the line, and the different textures and color combinations are just lovely. The kits are so well designed! But the icing on the cake is the Assembly Line ScrapBooking (ALSB) directions posted on the website. When your kit arrives, you are treated with a mini magazine full of inspiration and information. There's also a code you can enter to download the ALSB instructions. Similar to Sheetload, these instructions give cutting diagrams and layout photos for 12-13 pages each month. I spend just under $41 for my kit which includes an embellishment pack and extra "Pound of Paper." Worth every penny, and more for the outstanding quality!
The assembly line instructions allow me to put together the kit's blank pages in about 90 minutes. I know building blank pages sounds silly, but when I am faced with a stack of paper and embellishments and a stack of photos, time stands still for me! Having an "almost finished" layout allows me to be creative in completing a page with appropriate pictures, embellishments, and journaling without the headache. I just hate it when I spend 3 hours on a 2 page layout, have to quickly put everything away to get dinner ready, and then wonder at where the time went! If you do decide to give them a try, please let them know I sent you!
Wednesday, February 13, 2008
What a cute cozy!

I got an email from DigiStitches the other day advertising a new project, the Grab N Go ID pouch. It was so cute I had to give it a whirl. My test stitch out worked really well, and as I looked at the colors, I was struck with inspiration. I'd been looking for a cozy for my new nano. The eyelet hole was just large enough for the headphone cord to sneak through. I love it when a plan comes together. If you're a machine embroiderer, you can purchase the file from DigiStitches.
Saturday, February 9, 2008
My new obsession is tags!


I have committed myself to using what I have on hand, and to using up scraps. What better way to do this than to make tags! They quick, they're colorful, they're fun, and they use up scraps! My first design starts with a long die cut tag. I used my Stampin' UP! slit punch to create a tab, and then I used my Scor-It mini to create a fold. Add a tiny piece of decorative paper, and you've got a cute tag that can conceal a message. All of the base cardstock I used is POP (pounds of paper) from Club Scrap.
Wonderful, exciting news!
I've been submitting my cards to publications for a while now, but I haven't been lucky enough to be chosen. On a whim last month, I submitted cards for a book. I was totally surprised when I got the email that 3 of my cards have been selected. The title of the book will be 1000 Handmade Cards. So I obviously have a lot of company! The cards are not all stamped. I know some people who have been chosen do letter press printing, Gocco printing, and more. I'm thrilled!
Tuesday, January 29, 2008
Send a little love

 One of my message boards roped me in. I had no intention of following the crowd. But then they appeared. The cute little tin mailboxes in the Dollar Spot at Target. I picked up four--I was very restrained. Many thanks to Emily Giovanni and her tutorial here:
Stamping and Stuff
My daughter and I both made mailboxes. Hers is on top, and my creation is below. I made the first one for DS's teacher, and DD will be giving hers to her teacher.
Subscribe to:
Posts (Atom)

