Check out my curry yellow owl in this sweet treasury:
Friday, February 25, 2011
Thursday, November 18, 2010
It's coming along!


The glitter house that is. Over the weekend I cut out the parts, glued it together, and got on the white base coat. I did not start this from scratch: I repurposed a microwave popcorn box. The base is assembled from pizza box lid. Thank goodness the lid was totally clean!
I didn't want to recreate the wheel, so I used the instructions here:
Building a Glitterhouse-Howard's How To
Because I was working within the dimensions of my recycled box, I had to scale up the measurements. Not as hard as it sounds, I just multiplied everything by 1.5, except for the light hole in the back. I've got a special idea for that one. My lighted house is going to be cord free.
Tuesday, November 9, 2010
Getting Ready for Christmas


My Christmas decor has always been a foregone conclusion. Pull out all the hand me downs, from both sides of the family, and display. End of story. For good or bad, that is changing this year. Maybe all of my blog reading has ruined me for another year of same old, same old.
I didn't know it at the time, but I bought my inspiration just after last Christmas. We always go upstate to visit my parents, and I always make a point to visit The Old Mill Antiques. I think they're in Muncy? Anyhoo, they're a great resource for one of my loves, vintage linens. And vintage cocktail glasses, but that's more the husband's thing.
I came across this reindeer hand embroidered tea towel and fell in love. I bought it with no idea of what I was going to do with it.
For a while I thought it might become an apron. With a background of some cool pink fabric, the cut down tea towel would make a cute pinafore layer. But something has stopped me from cutting into it.
I think I'm starting to realize that it's all about the colors. It started two weeks ago when I was trying to find last minute Halloween decor at Home Goods. What did I see... super cute tinsel in feather trees in wonderful cotton candy colors. Garland and wreaths to match. Hmmm, an idea is brewing.
Yesterday at Michael's... Vintage looking pink mirror glass hurricanes and tea light holders. Oh, this is going somewhere.
Finally, this memory jogger of my love for little vintage glitter houses:
Glitter House Project by Sarahiscrafty
I'm eyeing up the empty microwave popcorn box right now!
Wednesday, October 20, 2010
Thrift Shop Inspiration

I'm an avid thrift shopper, but I'm very anti-clutter. Sometimes I see things that I think are really cute, but I have no idea how I'd use or display them. One thing that falls into that category is globes. Sometimes they're not in the best shape, and being at the thrift, you can bet they're out of date as well. So what to do with them?
I think this idea is awesome:
Chalkboard Globe Makeover
So of course, I made one for myself. I found a similar globe, only $3, with a plastic meridian. I didn't want to shell out for the chalkboard spray paint, and honestly, I wasn't turned on by the black globe. Martha to the rescue--she had posted a recipe for custom chalkboard paint. I just happened to have a big jar of "teal elementary school chalkboard" paint in the cupboard. Add a dash of unsanded tile grout and I was in business.
First off, I painted the globe with a couple of coats of gesso just to seal the paper. I followed that with 4 coats of the chalkboard paint--one layer horizontal strokes, one layer vertical till the coverage was good. I was using a cheap disposable foam brush which did leave a few brushmarks, so on the final coat, I went over it lightly with the rounded edge of a hydra sponge. It definitely gave the paint a smoother finish.
For now, the globe is living on the kitchen island, but I'm sure it will move through the house as the Halloween decorations are put away.
Sunday, October 3, 2010
I'm still here
This summer was brutal in Philly, and sadly, with a west facing, un-airconditioned craft studio, precious little was created. I managed to keep up with my greeting card club, sending off 5-10 birthday cards each month. But really, that was about it. I know I managed a few repairs, the odd button sewn on or fallen hem tacked. But really, I wilted.
Suddenly, fall is in the air. I'm wearing a wool jacket and it feels good! I spent the afternoon yesterday at the football field. I'm feeling re-inspired.
My daughter is in 6th grade this year and is officially a middle schooler. She has asked to have her first Halloween party, and really, who can say no to a party? This summer, our neighborhood has become Mad Men style cocktail party capital, so I think the kids deserve their turn. So step one is invitations. I could have spent hours and fifty bucks making multi layered, multi papered, glittered, stamped, colored and rhinestoned invitations. They would have looked really cooh, heh heh heh. But yeah, I'd rather drop the bucks on food, decorations, and 20+ iTunes downloads for the party playlist. So I went cheap: I found a great vintage Halloween image, uploaded it to the computer, busted out the GIMP, and designed an invite. Then, I uploaded the invite to Walgreens, took advantage of one of their weekly photo specials, and sent my image over. Invites, 10 cents a pop--and I didn't have to hand write a thing!
My next couple of weeks will be total party planning mode. I picked up a case of generic 7-Up at Aldi for $.39 a bottle yesterday. I'm thinking that the soda combined with a tub of rainbow sherbet in a punchbowl will make a really disgusting looking, and delish mocktail for the party.
I'm sure Em will want a pinata, so I'll have to decide whether to DIY, or pick one up at El Changarro for $15. And fillers--are 6th graders too old for candy? What else would be cool to add? Do I put in a super special prize like a $10 iTunes card, or will that cause fistfights?
Finally, this year's Dia do los Muertos altar will be dedicated to our dog Daisy, who passed away in February. She was truly my first kid, and a wonderful companion. I'll need to gather up a few photos of sweet Daisy in her prime, and I'll also put our her collar, food and water for her, add some candles and marigolds and pretty it up.
Monday, March 2, 2009
Chocolate suede Nintendo case

I created this Nintendo DS carrying case from the tutorial so generously provided by Mad Quilter here:
Mad Quilter
I embroidered the leather to start--first time with that and the design isn't 100% perfect. I should've used a sharp needle instead of the universal.
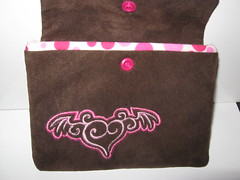
The leather was a bit bulky to sew through, and I broke 2 needles squaring off the bottom of the bag. I opted not to topstitch the top edge of the bag. It's a good thing I like the contrast lining rolling up around the top edge of the leather!
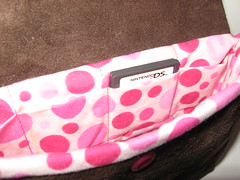
There are 8 game slots inside the pouch--plenty of options for my little Nintendo junkie!
Thursday, February 12, 2009
Making the inexpensive special


I was wandering around Ikea the other day and found some pretty nice sheets marked down to $3.99 per piece. Of course $12 for a set of king sheets sounded pretty good to me! I got cottage blue fitted and flat sheets, but the only remaining pillowcases were a soft taupe. The mis-match wasn't going to stop me on my bargain hunt! In about a half hour, I added a bit of vintage (through modern invention) embroidery to the pillowcases to tie them to the sheets. The embroidery files are available on Ebay through Vintage Machine Embroidery.
Subscribe to:
Posts (Atom)

