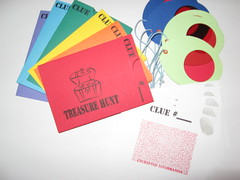
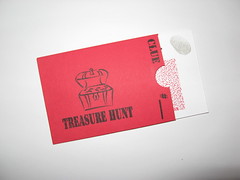
More crafting fun! I created a fun Treasure Hunt kit with stamps from Clear Dollar Stamps. It was a bit work intensive, but definitely worth it! I'm sure my son's next birthday party will involve a fun frenzy of treasure hunting!
I had a bit of a hard time getting the red cellophane for the lenses. They did have it at AC Moore (but not at Michael's) but it was a pretty large roll, and it was $4. I'm sure you will understand when I say that I am a frugal crafter! I ended up scoring the cello at a local art supply store which also has a decent candy making department. The roll was nearly as large as the one at the Big Box, but it was only .99!
The lenses were punched from two layers of cardstock, which allowed me to sandwich the cello. They were also nice and sturdy, but I wanted to be able to have a way for the kids to carry them along from spot to spot. I decided to add an eyelet and a bit of heavy elastic thread. Mission accomplished!
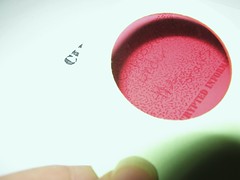
To write out the clues, you just write lightly in pencil on the red stamped box on the clue card. If you're using a red lens, I also found that pale green marker works really well.
Sunday, November 30, 2008
Tuesday, November 25, 2008
Don't make these mistakes!
A couple of years ago, a dear friend gifted me a beautiful Odessa hat. My sweet daughter promptly stole it from me. While she loves the hat, it isn't her favorite color. I decided to go ahead and knit her another Odessa in the turquoise she so loves.
Mistake 1: not printing out the pattern. The Odessa was originally published in MagKnits, an online zine that closed up a while back. The pattern has been moved to Ravelry, but I had never joined. If you're at all interested, do request an invitation, it only takes a few days! So I got about as web savvy as I could (read: not at all) and plugged the old Magknits link into the Wayback Machine, and I got my pattern.
Mistake 2: cheap yarn. OK, pure laziness on my part. My local yarn shops aren't all that local, or they don't have convenient hours. Thirty minute drive to a yarn shop, or hit the yarn aisle when I'm at Michaels three times a week? Sadly, I bought the yarn at Michaels, and it was cheap Red Heart. I was forced into it by weight and color--they do have a few decent balls of yarn there, but none suitable for the Odessa.
Mistake 3: not making a swatch. OK, more laziness. But I'm not a master knitter, so I can't even wrap my brain around swatching this pattern. It's knit in the round, so I'd have to basically knit up a hat to get a swatch anyway. See where this is going?
The finished project:

It doesn't look terrible lying flat. But it's too big for Emmy. It's OK, I'll wear it, but it's nowhere near as lovely as the gifted Odessa. Let's just say that Red Heart DK isn't at all DK. It's more like worsted. Plus, my hands started to hurt after a couple of hours of knitting. I hate hate hate it when yarn creaks. Lessons learned! I'll hit the yarn shop after Thanksgiving and find some proper yarn. I still have half a ball of crummy Red Heart left. I swear I'd burn it if I knew it wouldn't release toxic gasses and immediately kill off an acre of rainforest!
Tuesday, November 18, 2008
Jumping on the bandwagon


I think everyone has bought the Top Note die from Stampin' UP! Mine finally arrived last week, and I just got some time to sit down and play with it. First, I die cut the Top Note in Tempting Turquoise and Pacific Point. I cut off the outer border of the Tempting Turquoise piece, and used my Quickie Glue Pen to attach the thin border to the Pacific Point piece. I'll put aside the inner piece to use on another project.
For the focal image, I stamped the butterfly image from Stampin' UP! Garden Collage set in Ranger Archival black ink. I used watercolor paper, so that I could go in with my watercolor pencils to color the image. Just a bit of blending with an Aquapainter and it looks great! Then I coated the image with 4 layers of Ultra Thick Embossing Enamel. When the last layer had cooled completely, I gave the piece a gentle crack. I rubbed a bit of Ranger Distress ink in Broken China over the image and wiped it off with a tissue to give the cracks a bit of depth.
Everything is layered up on a piece of Sahara Sand cardstock stamping in Going Grey with the Floral backgrounder (all items are from Stampin' UP!).
Sunday, November 2, 2008
Cool new Purple Onion stamps

I recently stumbled upon the new Note Block stamps at Purple Onion. Not only did I like the bold graphics, but I loved the potential for super quick cards that these stamps afforded. I was supposed to be cleaning up the office today, but I stole five minutes to whip up a quick holiday card.
First I stamped the Happy Holidays Note Block stamp on to some striped paper. I quickly cut it out with a craft knife and matted it on some tomato red paper. I created a card base with Stampin' UP! Garden Green cardstock which was embossed with the Cuttlebug Swiss Dot folder. I tied some Stampin' UP! striped grosgrain ribbon around the card front, and mounted my stamped image on some dimensionals. Easy peasy!
Subscribe to:
Comments (Atom)

